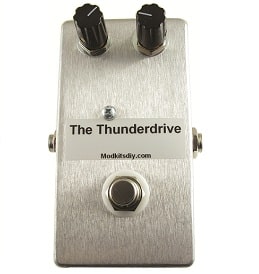
 Ever wanted to build a piece of equipment yourself? Instead of buying that $300 pedal, you could spend a little bit of time and some elbow grease and build it yourself. Well, with the Thunderdrive Pedal from modkitsdiy.com, you can get your foot in the door, and learn a few things about electronics along the way.
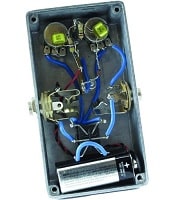
Upon receiving the pedal from Modkits, I opened up the box and checked it out. Inside the metal box that will soon become your self-built distortion pedal lies a bag full of all the resistors, pots, wires and input/output jacks needed to build the pedal. I was a bit overwhelmed at first, viewing the instructions and realizing I was going to need to solder. Soldering is the process of melting metal, or solder, and using it to connect a lead to a point to make a solid connection. It’s something I had watched someone do once, but had never actually done it.
The first step I took was I looked at the tool list:
- Wire Strippers
- Needle Nose Pliers
- Cutting Pliers
- Desoldering Pump
- Solder (60/40 Rosin core)
- Soldering Station
- Phillips Head Screwdrivers
- Slotted tip screwdrivers (3 mm tip)
- Channellock Pliers (or similar)
- Ruler
- Hobby Vise
 I first went to radio shack and snatched up a 40-watt soldering iron for $10, which wasn’t a bad deal. You want the iron style one with the pointed tip, NOT a soldering gun. I tried this first actually, and it really didn’t work well. I got some 63/37 rosin core solder for $5. I was not about to invest in the whole soldering station for $50 because I don’t solder every day. Luckily, my grandpa has an awesome garage FULL of tools, where I was able to snatch up some wire strippers and pliers. As far as a ruler went, I used my finger, using each joint as an inch. Now I was ready to build.
Thoroughly read each step, careful to not make any mistakes. Make sure you understand what each part is before you use it. You don’t need to know what it does, but just where it goes, careful not to make any wrong connection. If you follow all the instructions, and make some solid solders along the way, after about 2 hours (took me about 4) you should have your very own distortion pedal. If you want the pedal to work, you’re also going to need a 9-volt battery.
When I first plugged the pedal in, it worked. When I engaged the distortion though, I had nothing, no sound at all. I was extremely disappointed, so I opened it up and checked all my connections. Everything was where it needed to be, and all the solders looked good. I figured it was a bad solder, and was bummed out. I contacted modkits, who told me I could send the pedal back, and they’d find the bad connection and send it back in working order. Put the pedal back together, and just to try, plugged it back in one more time…IT WORKED! I didn’t understand it, but it worked, and I couldn’t believe it. What appeared to be the problem was a short between the battery and the electronics, which they gave you a piece of tolex to prevent from happening, but must have been making a connection somehow. I couldn’t have been happier.
For a good, pretty simple project, the Thunderdrive pedal from Modkitsdiy is pretty cool. It has a cool sound, and once you get the hang of soldering, isn’t too hard to do after all.
Modkits Thunderdrive Video Review


Be the first to comment