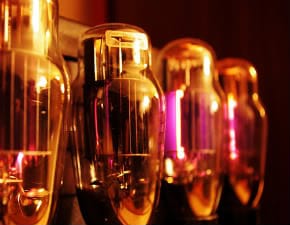
What is a vacuum tube? — If the link between a light bulb and a raging Marshall stack doesn’t seem obvious, take a glance at those vacuum tubes glowing inside your amp. And then pay your respects to Thomas Edison, the Wizard of Menlo Park, New Jersey.
Edison produced an incandescent light bulb in the late 1870s by feeding an electric current to a filament until it burned bright red. He then sheathed the filament in a glass bulb and extracted the oxygen, thus creating a vacuum to prevent the filament from burning up.
 During further experiments in 1883, Edison detected electrons flowing from the filament, through the vacuum and over to a metal plate he had placed inside the bulb. This discovery, named the Edison Effect, remained a minor phenomenon until another scientist, John Fleming, found that these electrons could be used to detect radio waves and convert them into electricity. Fleming added a second metal element to the bulb, thereby creating the first diode, or—to use a name more familiar to guitarists—rectifier. In 1906, inventor Lee de Forest added a third element to the bulb and found that the resulting triode could be used as both a switch and an amplifier. Today, the vacuum tube has evolved to include a complex assembly of plates, grids and heating elements that produce a more efficient part.
Why does a guitarist’s favorite electrical component rely on technology more than 100 years old? And why aren’t vacuum tubes used in anything else today other than specialized music equipment? The answer to both questions is: Because they don’t work very well and sound wonderful trying to do it. Such is the case with tube distortion. When a tube reaches “saturation,” it contains a veritable swamp of electrons. The result is a tone that “sags” slightly before it comes crashing out of the speaker with a pleasantly crunchy rumble. That sound has been at the heart of countless blues and rock songs. And as grandma used to say about grandpa, it may take him a while to get warmed up, but he makes sweet music like no one else.
 The basic technology behind the modern vacuum tube has been around since 1906. Yet few musicians seem to have even an elementary knowledge of this rather low-tech device. In reality, the various functions and characteristics of tubes are easily understood. What’s more, once armed with this knowledge, you’ll be better equipped to troubleshoot amplifier problems and to improve your guitar tone.
Tubes (called valves in other parts of the world) can be divided into three families: preamp, poweramp and rectifier. Each family comprises a range of tube models possessing different performance specifications. Every model of tube has its own tone characteristics, and even two identical tubes generated by the same manufacture will produce marginally different sounds.
Of the three varieties of tubes, preamp tubes are the smallest, and they are the first tubes that a guitar signal encounters in an amplifier. It’s here, in the preamp stage, that the lion’s share of tone shaping takes place and where the desired amount of gain is applied to the signal. The common preamp tube is the 12AX7, also known as the ECC83 outside of the U.S. Technically speaking, the 12AX7 is suppose to be “hotter”—that is, possess more gain—than the ECC83, although from my experience, the difference between them is slight. The model 7025 preamp tube has more gain and is brighter than the 12AX7, but it is rarely found in the U.S. It’s worth noting that most preamp tubes are interchangeable.
Power amp tubes, also called output tubes, boost the signal as it leaves the preamp. They are the largest variety of tube and, once installed, must be biased in order to optimize their performance within the amplifier. When driven hard toward their maximum potential, power amp tubes produce output distortion, a warm, organic sounding and very desirable tonality whose characteristics are determined by the power tube’s distinctive attributes. While some models of power amp tubes are interchangeable, many substitutions can’t be performed without amplifier modifications, and a few substitutions are impractical due to amplifier designs.
why tube amps?
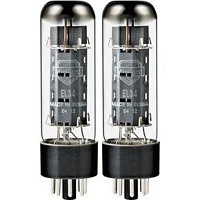
One of the most common and popular choices of output tube is the EL34. Widely associated with British amp makers, including Marshall, Orange and Hiwatt, the EL34 sounds great when driven hard, maintaining warmth, crunch and great dynamics, with evenness on both the low and top ends. The EL84 is another great-sounding tube with a rich British history. Although smaller than the EL34, the EL84 is anything but weak. Employed within Vox AC30, making the 30-watt amp sound, at full volume, like it’s pushing 50 to 75 watts, while retaining sensitivity, warmth and a sweet distortion.
Other popular output tubes include 6L6 and 5881, which can be found in Fender, Mesa Boogie, Peavey and more recent models of Marshall amps. The 6L6 tube is powerful and maintains clarity and definition while delivering a big low end and harder crunch than EL34. The 6V6 power amp tube has been a very popular choice in low-power combos. It’s a well-rounded performer in all ranges of the frequency spectrum and distorts relatively quickly, delivering a desirable sound. The 6550—probably most famous for its use in the Ampeg SVT bass amp—is seldom used, but it is a powerful beast, with a slug like Mike Tyson. Marshall amps that employ EL34 tubes can be professionally set up to run on 6550s, whereby they produce a mammoth bottom end.
Rectifier tubes, which include the GZ34, 5AR4 and 5U4, convert AC current to DC current. They are, however, a thing of the past, since most modern amps employ a solid-state rectifier in place of a rectifier tube. Even so, a tube-rectifier amp produces a type of compression that creates a “sag” in a signal’s tone; solid-state amps have a stiff response by comparison. Tube rectification isn’t necessarily superior to solid-state rectification; it’s really a matter of personal taste.
It’s important to remember that tube have a finite life span, Each time you fire one up, you wear it down a litter further. Eventually, you’ll need to replace all of your amp’s tubes in matched pairs, quartets or sixlets (depending on your amp’s requirements) and have any new power amp tubes properly biased by a professional. If you gig and rehearse heavily—say, four nights a week or more—I recommend that you replace your tubes once a year. If you play less often, keep your ears open for diminished tone and response from your amp, and replace your tubes at earliest sign of trouble. Where tubes are concerned, sooner is better than latter.
How To Bias Tubes In Your Guitar Amplifier
The bias of guitar amp tubes is the amount of electricity that each tube uses in relation to the other tubes in the amplifier. The sweetest overall tone and longevity of guitar amp tubes is attained when all of the tubes in the amplifier are drawing the same amount of current or electricity. More often than not, the older tubes in the amp end up drawing less current from the power stage. That remaining current has to go somewhere, so it consequently causes an overload on the other tubes. The overload can result in horrible sound and even damage to the amp or other tubes. The tube bias is measured in volts by using a simple voltage meter.
 The first thing that you will want to do before embarking on this project is to check out the amplifier’s owner’s manual. Tube amps are often biased in different ways depending on the amp manufacturer. Depending on your amplifier you may find that there is a small dial called a trim pot that simply adjusts the bias for all of the tubes in the amp at once, other amps have trim pots for each tube that can be adjusted individually, In most common amplifiers there will be two trim pots with a switch so that you can choose between two biasing preferences.
One thing to understand is that this equipment operates at very high voltages. 300 – 400 volts of electricity can be found in a tube amplifier. This much voltage can kill you. It is important to follow all safety instructions and heed all warnings.
Before working on biasing your tubes be sure to first unplug the amplifier. After the amp is unplugged let it sit for a few minutes to let any residual electricity drain. Once you open the amp up you will need to drain off any remaining voltage by connecting a short jumper between the preamp plate and a ground. The jumper will drain any remaining high voltage. You should leave this jumper hooked up until you are done biasing the tubes.
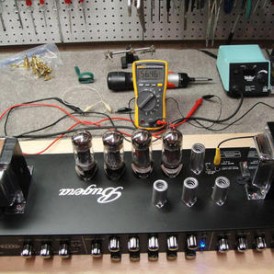
Before you take your amplifier apart gather the required tools. You will need a screw driver, a bias meter, and bias tester for this project. Carefully remove any screws and remove the back panel on your amplifier. Gently unplug the tubes that you want to bias and plug them into the bias tester. The tester should have three sockets on it. One to plug tubes into, one to plug into the tube socket on the amp, and one that plugs into the bias meter. The bias meter will display the bias of the tube in volts. There will be a shunt resistor switch on the tester to switch between tubes. Adjust the trimmer pot on your amp to increase or decrease the bias. The key is to get each tube to receive an equal load of current. Again, refer to the owner’s manual of your amp for recommendations. For future reference it is a good idea to write down the end settings of your tubes.
Video Demonstration How To Bias Your Amplifier
a Fender Hot Rod Deluxe is used in this video, but gives you an idea how to bias your valve amp.


Great overview! I like your blog I will be checking back regularly! I just published a related article on solid state rectifier vs tube rectifiers at:
http://thegearmall.com/
What did you mean by ‘most preamp tubes are interchangeable’? Does this mean you can have two brands of preamp tubes in at the same time, or that you can use a 12AX7 with a 7072?
Good review, I found it helpful
WOW just what I was looking for. Came here by searching for amp tubes